I have been in the midst of revamping my office this spring, and today I want to show you an inexpensive way to spruce up old pillows! DIY Fabric Printing! In case you didn’t see my home office rustic makeover, click here for more ideas and inspiration!
I have two chairs I recently recovered that sit in my office. They have linen pillows sitting on them – but I was tired of the plain pillows. I started looking up pillows online, to replace my old ones, and then realized anything I liked was at minimum $50 per pillow. Being that my pillows match (and technically there was nothing wrong with them), I didn’t feel like spending $100+.
Above you will see some of the pillows I was considering for the look of my office, plus the ones I did myself. When I saw the pillows with the quotes from Audrey Hepburn and Coco Chanel on pink fabric, I thought to myself – I can sew on new fabric to my existing pillows to freshen them up.. I just needed to figure out how to print on fabric (I didn’t want to do an iron-on fabric because I wanted a more professional look). I considered stenciling with paint (the pillow that says “France 7 Postes”) would have been perfect for that concept…. but that sounded too messy & time consuming. I felt like there had to be a way to print on fabric by running it through my printer. I started researching this method online (what would we do without google????) and sure enough I found a way! I was so excited, I knew that I wanted to pass on this knowledge to our readers! Guess what the trick is so you can run fabric through your printer… FREEZER PAPER!
Supplies needed:
Fabric for printing (8.5 x 11 size)
Freezer paper
Iron
Scissors
Needle /thread (if sewing on pillow)
Pillows
———————–
Directions:
1. Create words/text/sayings of your choice on any program such as Word. (change fonts & sizing to get the look you want)
– I chose two fun quotes: “Paris is always a good idea” by Audrey Hepburn and “A girl should be two things: Classy & Fabulous” by Coco Chanel.
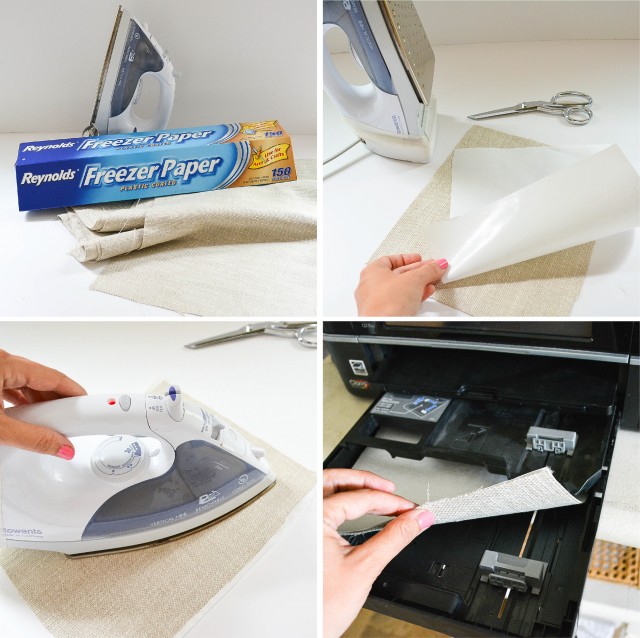
2. Cut fabric and freezer paper to 8.5 x 11″. Place fabric and freezer paper together – with the shiny side touching the fabric (it will stick to the fabric lightly). Leave the non-shiny side on the outside.
3. Iron both sides together – I actually ironed on the fabric side first, then flipped it over and ironed out the bubbles on the paper side (the bubbles can get caught in the printer, as I have learned)
4. Make sure fabric and paper are really pressed together, and then put it in your printer tray as you normally would (for my printer, I have to put fabric side down, in order for the printing to happen on the fabric side)
5. Once printing is complete, allow it to dry a little to prevent smudging. I noticed (from trial and error) that on thicker fabric, ink will bleed a little and on very thin fabric, it truly prints like it is paper. I am going to a rustic look, so I used thicker fabric and was fine with some ink smudging.
6. Trim your printed words to the size you like.
7. Hand stitch the fabric to your pillow.
Easy, right??? And I spent $5 on the freezer paper to give my old pillows a new look. I had scrap fabric already, so this was money I didn’t have to spend as well. You could easily find plain pillows at discount stores if you don’t have some laying around the house. You will still save money doing this concept, plus you can personalize them however you like! Not to mention, if I decide in a couple years that I want a new look, I can take off these fabric rectangles and replace with a fresh quote, text 0r graphic by doing it again.
Now that I know how to print on fabric – I’m going to have fun with this! I can’t wait to come up with more ideas on how to use this concept for our party world!


FANTASTIC!!
HI! what font did you use for the paris is always a good idea pillow?